How to wire a ph meter with thermocompensation in the field
Hello, a customer has purchased our PH meter with warming function.He didn’t know how to wire it up in the field.
The following is a demonstration of the complete wiring procedure for a ph with temperature compensation.
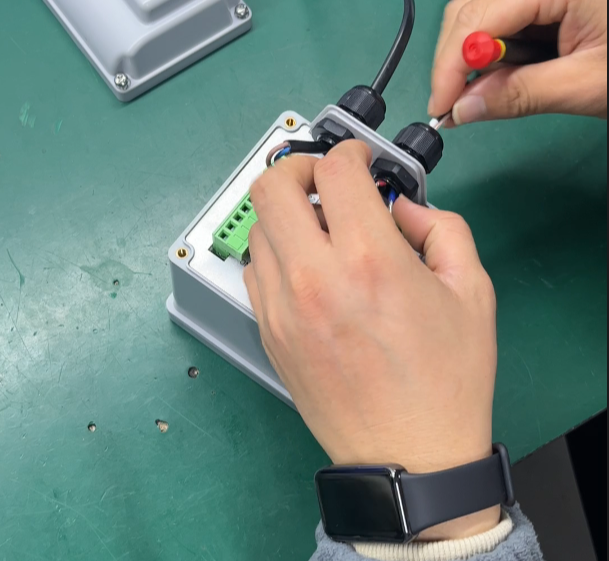
First, after receiving the PH meter, the screwdriver opens his back cover.Plug the pre-prepared power cord into the waterproof nut.
The table is connected to Two hundred and twenty volts power supply according to the label.
Take the sensor probe and insert the other waterproof nut.
The sensor has a total of four wires.The white colour is the PH output signal line of the sensor.White signal cable to input.Black is the reference signal line.
Equivalent to negative PH meter sensor input.
The temperature has two wires.Separate access to positive and negative according to the label.
There is no positive or negative wiring for temperature.Just connect two ports at random.
After the wiring is complete.Check that the terminals are correct.Is the wiring secure?
This completes the wiring for our PH meter with thermocompensation.


How to install ph meter
hello erevyone,There are many customers and friends who have purchased wohuan’s pH meter.
Not sure how to install it in the field.
Here’s a show for you.Complete wiring procedure.
Firstly after getting the PH meter.Open the back cover.
Take out the power cord.The power cord is connected to 220 volts according to the label.
Then take out the sensor wiring for the PH meter.
There are two wires.Transparent red is the measuring line.It’s the sensor input signal line.Access input.
And finally, the black reference line.Equivalent to the negative input of the sensor.Access to REF.
After wiring is complete.Check that the wiring is correct.Is the wiring secure?That completes our wiring.


ph meter assembly video
The bottom plate is placed in the front housing as shown.The black metal protective cover is placed on the bottom plate as shown.After assembly, fix the four corners with end screws.
Pin row, protective cover, bottom plate, main housing, required screws.
Install the row pins at the bottom plate joint.Press tightly and place in the main housing.
Direction of attention.After completion, as shown in the figure.Secure the top two points of the bottom plate with long screws.
Stitch through the black metal protective cover.Cover the upper half of the bottom plate.
Use short screws to fix the bottom two places of the base plate.Secure to black protective cover with short screws.
After completion, as shown in the figure.Insert the row pins into the front housing and secure them.Clamp the front and back sections.Press the connection tightly.Finally, the pH meter is installed.


pH meter debugging video
Wiring as shown in the figure,Make sure the wiring is correct,Power on and start debugging,Keys from left to right are,Main menu, return, Confirm, query.
First, click back,Enter the main menu,Press the right arrow,Select Verify Maintenance,Press the Confirm button to enter the output current.
Press the Confirm button to enter the calibration,Press the Confirm button to proceed to the next step.
Current one is the current of pH,Click the confirm button,Now the pH current is strung through an ammeter.Start by calibrating four milliamps.
The table shows three point nine eight,Press the up button to go to four,Click the confirm button,four MA calibration complete.
Then calibrate tweny mA,Press up to increase the ammeter value to twenty.Click the confirm button,twenty MA calibration complete.
Next, press the right button to calibrate the temperature of the current,Click the Confirm button to enter.
The temperature current is connected in series to this ammeter above,This ammeter has an error.four mah control at four point zero three,Click the confirm button.
Then check twenty mah.The twenty mah value should be around twenty point fifteen totwenty point sixteen.Up is plus, down, left, right, all are minus.
Now let’s right-click and make the value around twenty point fifteen totwenty point sixteen,Click to confirm,twenty MA calibration complete.
Press back.Click the Down button and select the Test relay page.Click the Confirm button to enter.
Press up.High alarm on, make sure there is a sound of suction.The same goes for low alarms.Press the return key to select the input signal calibration.
Click the Confirm button to enter.Look at the thermometer at twenty point nine.
The table can only show an error of plus or minus one.Round it up to twenty-seven,Now on the table twenty six,Press up to add one,Click OK,Press the main menu key to test whether the four eight five display is normal.
Display normal,Let’s see power consumption is less than two watts.No problem.Current value thirteen point nine six fourteen MA.pH debugging is complete.


Water quality analysis products:


